
In this article, we will learn how to do advanced postman setup for automating our daily web development task.
So, let's get started...
How to Setup Multiple Environments in Postman?
If you prefer watching a video...
Be sure to Subscribe to the Official TutsCoder Youtube Channel for more videos.
Basically, environment is like a context where your app is running, and in postman we can define some variables for each environements.
Open the Postman application from your system and then select the environments tab from the left side menu and click on the "Create New Environments" button.
Then provide the name of your environment like <your-application-name>-prod and then add your required variables and click to save button.

Now using the above same process you can create multiple environments in Postman.
Once you have created the environments, add your required API on postman and select your created environment from the top right side.
Replace your API URL from https:www.yourdomain.com/api/login to {{url}}login and it will run again properly.
So, using this way you create environments in postman and whenever you need to update the URL, you just have to update it from environments instead of manually changing it for each API.
How to Automate the Token selection process?
Most of the time when we develop APIs like login and then get user profiles based on this user token, we have to copy the received token from the response and then paste in the authorization header in other APIs.
So, let's automate this process:
Go to your login API request section and select test from the list and paste the below code there:
pm.environment.set("jwt", pm.response.json().token);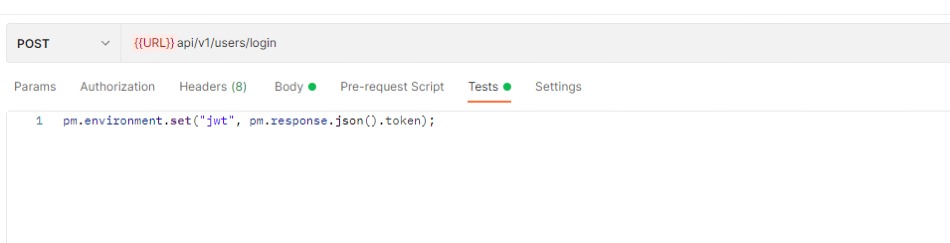
Make sure to update the key jwt with whatever key you recived in the API response.
Now go to another API request which requires this jwt token for access, and update authorization as below:
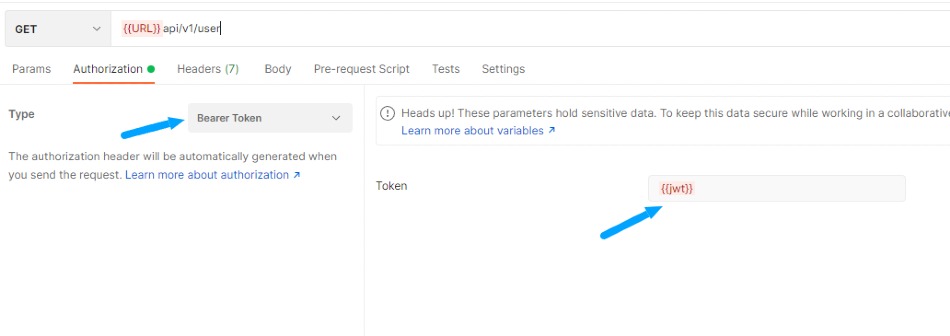
That's it, so now when you make a login API request, your jwt token will be automatically set and updated by other required routes.


Leave a Comment
Share Your Thoughts