In this tutorial, we will learn about how to create EC2 instances in AWS step by step.
So, let's get started...
Create EC2 instances in AWS step by step
What is AWS?
Amazon Web Services is a very popular and reliable platform to host our application on top of their servers.
There are many types of amazon’s services that we can use to host our app, but we will use EC2 (Elastic Compute Service).
It is free and provides a very customized configuration during the creation process.
We can create an instance: a set amount of resources initialized (OS, disk space, Ram, etc).
Also read,
Why EC2?
Why EC2? Because it’s free and provides very customizable configurations to the end user.
We can select our favorite Linux-based operating system and install all the required utilities and software on that OS.
Before creating EC2 instance make sure you have selected right region, which is near you.
Step:1 Create an account on Aws
Go to https://www.aws.com and create a new account on AWS. If you are already registered on AWS then go to AWS console.
In the signup form, Choose personal account type, provide all the required information and fill the signup form.
An AWS new account lets you try the free tier of Amazon EC2, Amazon S3, and Amazon DynamoDb services for 12 months.
Step:2 Launch an EC2 instance
Now that the signup process is complete, go to the AWS console and provide login credentials. Once you are logged in you can see all the AWS services under the AWS Services section.
Click on the EC2 Service under Computer Service,it will show us EC2 Dashboard page, on this page just click on Launch Instance button under Create Instance Section.
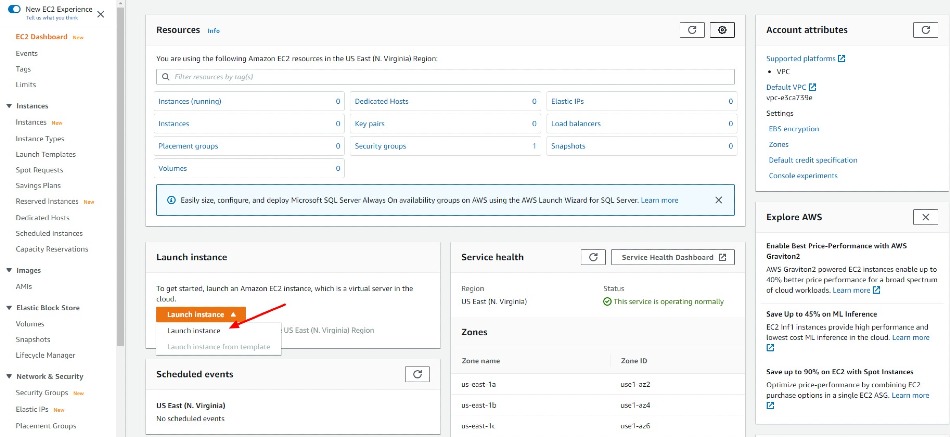
Step-3: Choose Amazon Machine Image(AMI)
We have to choose Amazon Machine Image for launching our instance. Amazon provides various types of images, but we will stick with Ubuntu 18.04 as we are trying under Free Tier Eligible.

Select Ubuntu 18.04 for image for our machine.
Step-4 : Choose Instance Type
After selecting the machine, we have to configure our machine and select the t2.micro instance type.

Step-5: Configure Instance Detail
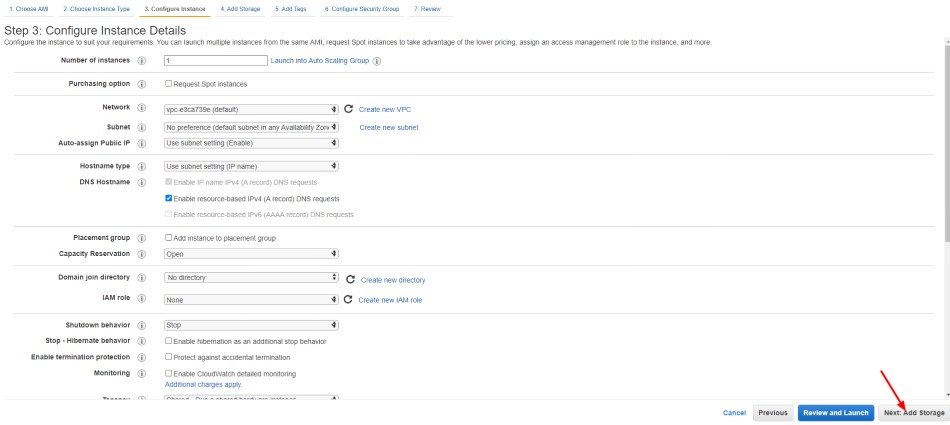
Here keep the Default details and Click on the Next Add Storage button.
Step-6 : Add Storage
Select default storage configuration and click the Next Add Tags button.
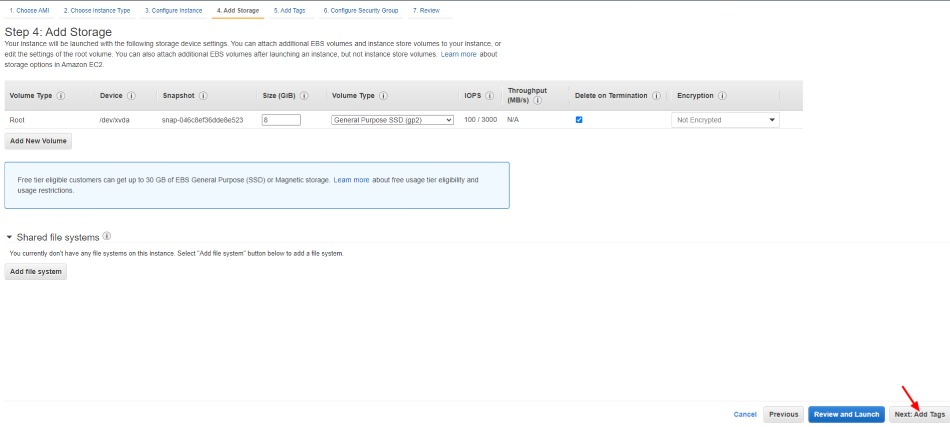
Step-7: Add Tags
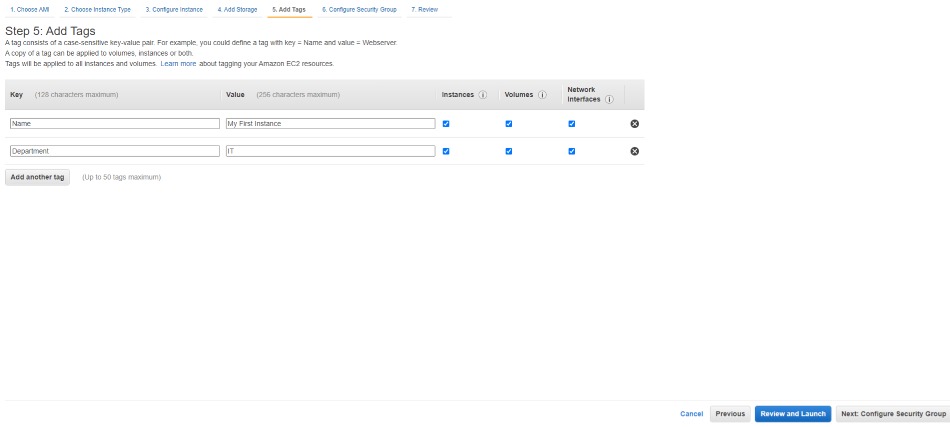
Now, we can see the Add Tags page. In this section, we have to add at least a single tag using key-value pairs. For example, you can add Key=name and value=First Instance. After adding the tag click on Next Configure Security Group Button.
Step-8: Configuring Security Group
After adding tags we have to open some ports of our server to communicate with the outer world. We can also configure these ports after launching the server.
Here we can set the network rules like allowing or denying inbound connection to specific Service Port and also can set Source as a particular user IP address or from any user accessing via the internet.
Basically, the Security Group contains a set of network Rules which are then attached to AWS resources like in this case EC2.
By default, it has a rule to allow SSH Connection on Port: 22 so the user can connect to our EC2 instance and execute commands.
Click on Add Rule button and add 80, 8080, and 22 ports.
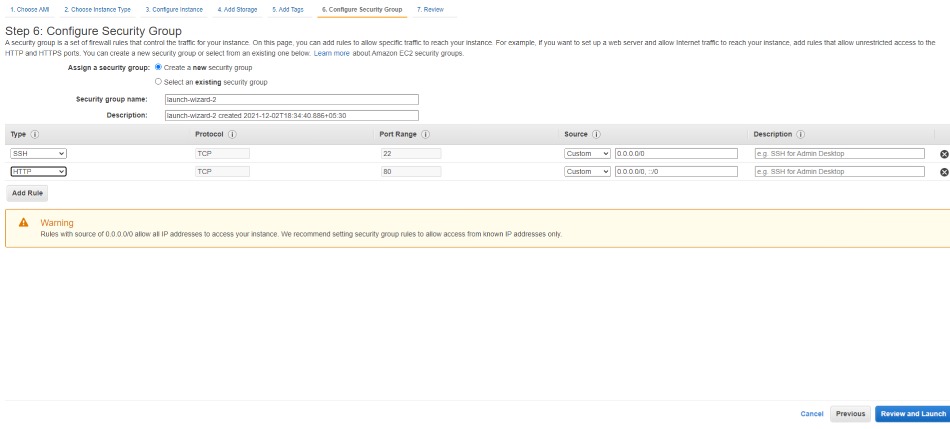
Click on Next Review and Launch button.
Step:9:Verify and Launch Instance
Now we are very close to launching our EC2 server. Click on the Launch Button and we will see a dialog box.
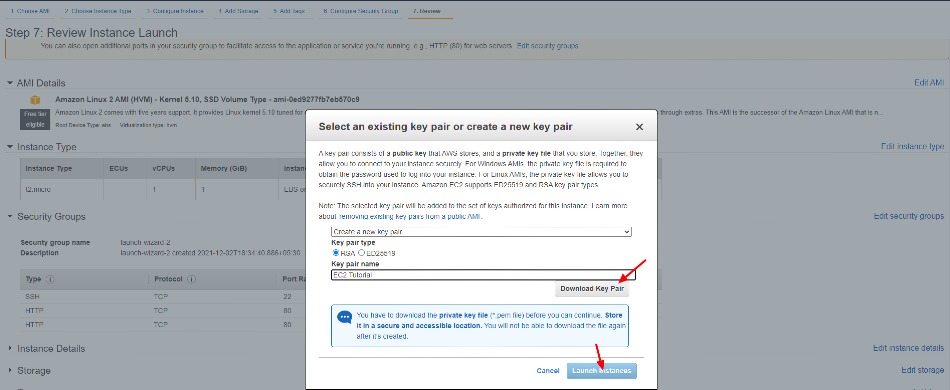
Create a new key pair and download it on your local machine. You can not generate this key after launching your instance.
Once the instance is launched you can see created instance in the dashboard and click on the instance to view more details like its state/Ip etc...
Cleanup
Once you complete your practice, you must have to terminate created ec2 instance in order to avoid any extra billing charges.
To do this, Select the instance to terminate from the dashboard
On the right side of the dashboard click on "Instance State" and then "Terminate Instance"
It takes a few minutes to delete instances and related resources that were created.
👍 Congratulations!... Now we have created our EC2 instance in the AWS server, now next we will see how we can connect to our instance using SSH.
Conclusion:
Do let me know If you face any difficulties please feel free to comment below we love to help you.
If you have any feedback suggestion then please inform us by commenting.
Don’t forget to share this tutorial with your friends on Facebook and Twitter


Leave a Comment
Share Your Thoughts